
Knowing How to Deflate a Bounce House Matters
You got your bounce house set up and operational without a hitch. Everyone’s had a blast and enjoyed the bounce house thoroughly. But now it’s the end of the day, and a question arises. Do you know how to deflate a bounce house the right way?

It probably seems pretty straightforward, right? Turn off the blower, roll it up, and you’re done. And that’s really the gist of it, to be fair. But the actual steps that go into deflating a bounce house are a little more involved.
We want to make sure your bounce house stays functional and safe for as long as possible, and we’re sure you do as well. So let’s make sure you know how to deflate a bounce house properly, in a way that won’t damage the unit.
How to Deflate a Bounce House: The TL;DR Version
Here’s a quick breakdown of the process involved in deflating a bounce house:
- Clear the bounce house of debris (and people!)
- Turn off the blower and disconnect it from the bounce house
- Open the easy deflation zippers fully
- After the bounce house has mostly deflated, remove the stakes from the ground
- Gently walk on the bounce house to push the remaining air out
- Fold the bounce house (see step 3 for details)
- Roll up the bounce house (see step 4 for details)
Step 1: Clear and Clean the Bounce House
This step should be carried out before you deflate the bounce house. With the blower(s) still active, go through the bounce house and remove any visible debris you can find. Be sure to check inside seams and crevices, too. Keep an eye out for jewelry, sticks, rocks, pens or pencils, popsicle sticks, or any other foreign object that shouldn’t be in the bounce house. These things can puncture or tear the vinyl when we get to the later stages of deflating the bounce house.
Are you planning on a deep clean in the near future? This is a great opportunity to give the bounce house a good sweep, particularly in the bounce area itself. You’ve already got the unit inflated with no more jumps happening, making this the perfect time to start cleaning.
Step 2: Deflate the Bounce House
Turn off the blower and completely disconnect it from the bounce house. Next, find the easy deflation zippers on the bounce house and unzip them to help speed up the process. Now just wait a few seconds. The bounce house will deflate most of the way on its own.
Once the bounce house has mostly deflated, remove the stakes from the ground and store them somewhere safely. Then, take your shoes off and walk onto the unit. Gently step on areas that haven’t completely deflated yet, pressing the air out of the unit. Continue this process until the whole bounce house has been deflated.
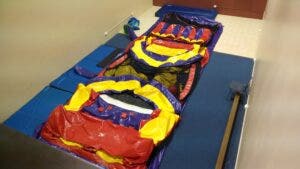
Step 3: Fold Your Deflated Bounce House
With all of the air removed, let’s start folding! First, you’ll want to fold protruding vinyl inward toward the middle of the bounce house. Make sure you keep the bottom down and the top inside; the bottom of the bounce house should always face the outside while folding and rolling it up.
Next, fold up the bounce house like a bed sheet. Fold the two outside edges inward toward the middle of the bounce house, then stop to walk on the bouncer one more time to remove excess air. Now fold the outside edges inward a second time, and again, walk on the bouncer to get rid of whatever air pockets are left.
Step 4: Rolling Up Your Bounce House
We folded up our deflated bounce house like a bed sheet, but now, we’re going to roll it up like a sleeping bag. Start at the end furthest from the deflation tubes and roll the bounce house toward those tubes. This way, we’re pushing air out of the bounce house and deflating it even further as we pack it away. This also works if you’re rolling toward the easy deflation zippers, if they’re not already packed away that is.
If you have a helper (and we hope you do!), it’s a good practice to have one of you walk backward on the inflatable as the other rolls forward. This way you’re helping walk out the remaining air as you roll.
Once you’ve snuggly rolled up the bounce house, gently tuck in the deflation tubes. If the unit has straps, use those now to keep everything firmly in place (otherwise you can use rope or bungee cable). If you have a storage bag for your inflatable, you can put it into that bag now.
That’s It! Your Bounce House is Deflated!
As you can see, it doesn’t take very long to deflate a bounce house. On average, you should be able to complete the full process in 5 to 15 minutes, depending on the size of the unit. A large commercial bounce house will of course take longer to deflate than a smaller, consumer-grade Vinyl Crossover™ inflatable.
Be sure to store your bounce house in a cool (but not cold), dry, elevated, accessible place. You don’t want the bounce house to get wet while in storage—that’s how mold and mildew grow—and you don’t want it to be damaged by things being set on top of it, or by harsh, cold weather.
Have any questions about how to deflate a bounce house? Please leave us a comment below or call our team of bounce house experts at 1-716-566-5806. We’d love to help you however we can!